January 02, 2016 @ 01:09
Making this blog - Flask, Python, crying on the floor
I'll be blogging about data journalism, web dev, dataviz and unicycling.
All of this stuff is pretty hands-on, apart from the unicycling.
To start, I'll explain how I made this site with a Python web framework called Flask.
Flask runs as a virtual host next to your Apache server, in my case on a VPS.
So on a Linux server, the files look like
-var
    -www
        -flaskApp
        -html
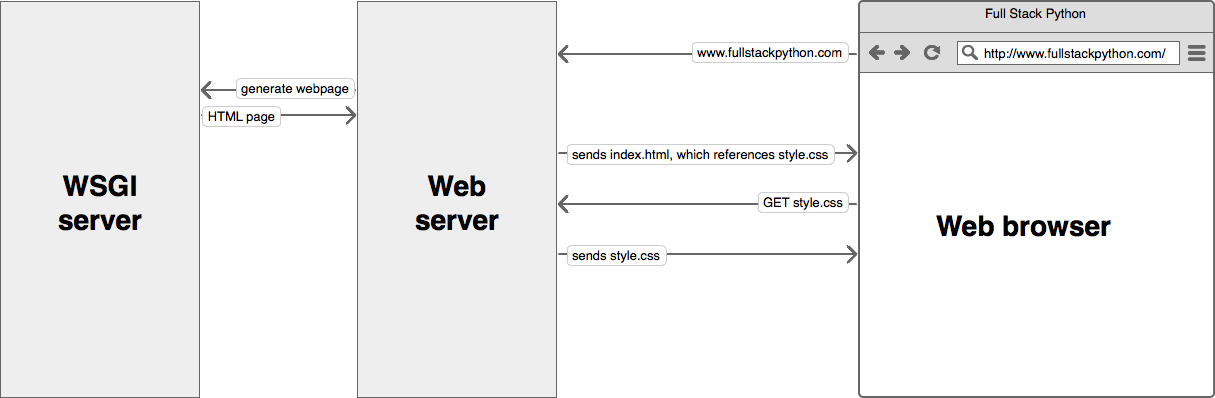
So for the page you're seeing now, there's a bit more to it than sending a request to the server and receiving the html.
Here's a great illustration of what's going on for each Flask page requested.
This works by setting up a sites-available file, where you listen for the domain name.
When a request is directed to your server from a DNS, if the domain name matches the one for the app, then your app is triggered.
To make the Flask app, I started with the tutorial on the Flask website.
The tutorial is great and the website you'll have created by the end is OK.

This is a fun and well-explained tutorial.
There's several reasons why I didn't stick with this basic blog site, since I actually want a blog.
- All blog posts were posted on the same page - I want to link to individual, archived posts with a query string.
- The CMS was above the posts - I wanted a seperate CMS page.
- The CMS wouldn't recognise markdown, and I'm a big fan of markdown in text areas (like Github, StackOverflow).
- I wanted to highlight syntax in code snippets.
I wanted to do all that, so here's what I different from the Flask tutorial blog.
CMS on its own page
While the blog in the tutorial is functional, I wasn't having good feels with the CMS appearing on top of the content.
So I created a separate template for the CMS.
The CMS code looks like this, inside the show_entries template. Remove this code from the show_entries page.
{% if session.logged_in %}
    <form action="{{ url_for('add_entry') }}" method=post class=add-entry>
        <dl>
            <dt>Title:
            <dd><input type=text size=30 name=title>
            <dt>Text:
            <dd><textarea name=text rows=5 cols=40></textarea>
            <dd><input type=submit value=Share>
        </dl>
    </form>
{% endif %}
And place it in its own template called cms.html
{% extends "layout.html" %}
{% block body %}
    {% if session.logged_in %}
        <form action="{{ url_for('add_entry') }}" method=post class=add-entry>
            <dl>
                <dt>Title:
                <dd><input type=text size=30 name=title>
                <dt>Text:
                <dd><textarea name=text rows=5 cols=40></textarea>
                <dd><input type=submit value=Share>
            </dl>
        </form>
    {% endif %}
{% endblock %}
In the app file, add a function that listens to the /cms path
@app.route('/cms')
def cms():
    if not session.get('logged_in'):
        return redirect(url_for('login'))
    return render_template('cms.html')
You'll be taken to that path, on a successful login.
In the login function, change this
return redirect(url_for('show_entries'))
To
return redirect(url_for('cms'))
So, you browser will make a new request for the cms page, and your cms() function will be triggered if you're logged in.
Making the CMS recognise markdown
Pretty simple job this one.
Use pip to install Mistune, which interprets markdown and replaces text with html elements accordingly.
@app.route('/add', methods=['POST'])
def add_entry():
    if not session.get('logged_in'):
        abort(401)
    timeNow = datetime.datetime.now()
    readTime = datetime.datetime.strptime(str(timeNow),'%Y-%m-%d %H:%M:%S.%f')
    formattedTime = datetime.datetime.strftime(readTime,'%B %d, %Y @ %H:%M')
    g.db.execute('insert into entries (title, entryDate, text) values (?, ?, ?)',
                 [request.form['title'], formattedTime, mistune.markdown(request.form['text'],escape=False)])
    g.db.commit()
    flash('New entry was successfully posted')
    return redirect(url_for('cms'))
Where the text is added to the SQL file, wrap that in the mistune.mardown function.
Since you're the only user of this CMS, you can trust yourself to embed iframes.
This is turned off by default. Use the escape=False param to allow embedding html tags.
Pretty-printing code blocks
A feature of markdown is when text is four spaces indented, it gets turned into a <pre><code> element.
There's this library - highlight.js - that pretty prints those as code blocks.
You'll need to put the js and css files in the static directory.
Here are the links that go in the layout.html at top of that document.
<link rel="stylesheet" href="{{ url_for('static', filename='default.css') }}">
<script src="{{ url_for('static', filename='highlight.pack.js') }}"></script>
Getting every post on a separate page
It's not much use telling someone about an awesome blog post you wrote in the dickitees if you can't link directly to the content.
Therefore, I created an archive page which has query strings.
This works by displaying the headling, date and first 100 characters of every post as a link to a previous story.
In the main app file, the code for this one is not much different from show_entries function -
@app.route('/archive')
def show_archive():
    session.pop('logged_in', None)  #Anyone who isn't on the CMS page, booted out
    entries = getSqlRecords()
    return render_template('show_archive.html', entries=entries)
And the template -
{% extends "layout.html" %}
{% block body %}
  <ul class=entries>
  {% if entries|length > 0 %}
    {% for entry in entries|reverse() %}
      <li class=archiveLink value=><a><p class=dateText>{{ entry.date|safe }}</p><h2>{{ entry.title }}</h2> <p>{{entry.text|striptags|truncate(100) }}</p></a>
    {% endfor %}
  {% else %}
    <li><em>Why not say something?</em>
  {% endif %}
  </ul>
{% endblock %}
This does what I said - lists a summary for each entry in the database.
So your /archive page is going to have a bunch of <li> elements on there - I gave mine the class of archiveLink. Clicking on those won't do anything at the moment.
$('.archiveLink').on('click', function(){
    var liCount = $('.archiveLink').length-1;
    var liClicked = $(this).index();
    var liString = liCount - liClicked
    var newRequest = '/post?postNum=' + liString.toString()
    window.location = newRequest;
})
This changes your browser location again.
Other options to this code would be a) set up an AJAX call to call a new function on click and b) add the href in the html template.
This will send you back to the index, which is the show_entries page in the tutorial.
I changed the show_entries template to show only one record at a time, and called it show_current.
Then I changed this function.
@app.route('/')
def show_current():
    session.pop('logged_in', None)
    entries = getSqlRecords() #I've made this abbstract for both functions
    showPost = len(entries)-1
    return render_template('show_current.html', entries=entries, postNum=showPost)
This code above is called whenever you go to the index page at / and it loads the most recent post
The code below is what catches the request when a user clicks on an archive link.
Note, you'll need to use global --- for a variable outside the function that is not passed in by a request.
You'll also need to elect the ['POST'] method, since requests are all 'GET' by default.
postNum = 0
@app.route('/post', methods=['GET','POST'])
def show_post():
    qString = request.args.get('postNum')
    global postNum
    if qString != None:
        postNum = int(qString)
    session.pop('logged_in', None)
    entries = getSqlRecords() #I've made this abbstract for both functions
    return render_template('show_current.html', entries=entries, postNum=postNum)
The show_current template, which the above Flask functions render, is what show_entries used to be, but it uses array notation to display the most recent entry only. Here's the very reduced show_entries template, now called show_current.
{% extends "layout.html" %}
{% block body %}
    {% if entries|length > 0 %}
        <p class=dateText>{{ entries[postNum].date|safe }}</p><h2>{{ entries[postNum].title }}</h2>{{ entries[postNum].text|safe }}
    {% else %}
        <em>Why not say something?</em>
{% endblock %}
Deploying the app on a VPS.
This was a nightmare for me, as I'd never used a server-side framework, and didn't know anything about wsgi. Wsgi is what makes the interaction between your Apache server and the Python script possible. I found these links to be useful when I was trying to nut out what was going on.
Something to watch out for is setting up the Wsgi file. I followed the Flask tutorial but became confused about this
#!/usr/bin/python
import sys
import logging
logging.basicConfig(stream=sys.stderr)
sys.path.insert(0,"/var/www/pathTo/App")
from app import app as application
For a while, I couldn't even figure out what the error was. You need to catch the errors for your virtual host in your sites allowed config file.
<VirtualHost *:80>PROPAGATE_EXCEPTIONS = False
    ServerName jason-thomas.xyz
    WSGIScriptAlias / /var/www/pathTo/App.wsgi
    <Directory /var/www/pathTo/App/>
            Order allow,deny
            Allow from all
    </Directory>
    Alias /static /var/www/pathTo/App/static
    <Directory /var/www/pathTo/App/static/>
            Order allow,deny
            Allow from all
    </Directory>
    ErrorLog ${APACHE_LOG_DIR}/error.log
    LogLevel warn
    CustomLog ${APACHE_LOG_DIR}/access.log combined
</VirtualHost>
Notice the ErrorLog entry on the fourth last line. That's where your errors will be saved.
But, you'll need to have 'DEBUG'=True and PROPAGATE_EXCEPTIONS = True for the errors to be logged.
It's recommended to turn debugging off, not that it's going to help me.
If you're on a Linux VPS, in the terminal do sudo locate error.log.
Your error should be in one of those files.